 |
| HTML and CSS tutorial for beginners in English |
Hello friends, welcome to KTL's HTML and CSS tutorial. Today we will study lesson 22.
In our previous lesson we have studied internal CSS and inline CSS.
Today we will learn CSS selectors.
CSS selector types
1. Element selector, 2. id selector and 3. Class selector.
Let us study them.
1. Element selector:
In this method we use the name of an element for mentioning style. For example,
p {
color: blue;
}
Here we have defined style for a paragraph. Therefore we have written "p" and written style for it. Now where ever "p" appears in body section, this style will be applied. We need not write any other code in body to do this.
Let us write this in our script. Open a new Notepad file. Copy all code from Lesson 21-1. Immediately below <head> write a comment.
<! Example of element selector>
This code is an example of element selector. We have given style for h1 and p. Save this file as "Lesson-22-1" and "Lesson-22-1.html". See figure below. Click on this figure for PDF file of source code.
 |
| Figure 22-1. CSS element selector |
Double click on the HTML document. Notice that the style that we have mentioned is displayed for heading and both paragraphs.
 |
| आकृति २२-२ Output of code using CSS element selector |
2. id selector:
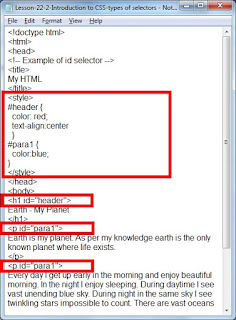
Now let us study id selector. Open a new Notepad file. In this file copy all text from Lesson-22-1. Remember we are only changing CSS selector. Therefore we are changing coding under <style>. Write the following code.
#header {
color: red;
text-align:center
}
#para1 {
color:blue;
}
Notice that a # sign is used for id selector. We have written two selectors here, one for h1 and other for para1. Now let us refer this in body. The following is written in header tag:
<h1 id="header">Earth - My Planet<h1>
For two <p> tags, write
<p id="para1">
 |
| Figure 22-3. CSS id selector |
Save this file as "Lesson-22-2" and "Lesson-22-2.html". Click on the above figure for PDF file of source code. Double click on HTML document and see the output. Output is the same as shown in figure 22-2.
3. Class selector:
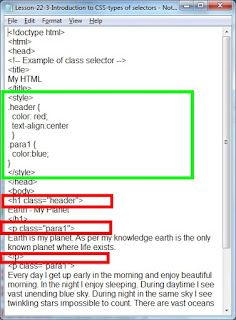
Let us study class selector now. Open a new Notepad file and copy all code from Lesson-22-2. Let us change code under <style>.
Replace #header with .header. Very simple!! In id selector # is used and in class selector a period (.) is used. Similarly replace # with a period (.). In place of #para1 write .para1. See the figure below.
 |
| Figure 22-4. CSS class selector |
Save this file as "Lesson-22-03" and "Lesson-22-03.html". Click on the above figure for PDF file of source code. Once again double click on the HTML document and see the output. We have same output.
Remember: A nested element always inherits the CSS properties of parent element. In other words, if we have defined one element inside another element then inner element inherits properties from outer element, that is inner element has same properties as outer element.
We can combine one than more one selectors. For example,
h1, h3, p {
color: red;
}
In this case this style will be applied to h1, h3, and p.
Important Points:
1. In element selector the name of element for which style is defined given.
2. For defining an id selector # is used. This is referred in body as "id=".
3. For defining a class selector a period (.) is used. To refer this later "class=" is written in the opening tag of the element.
Lesson-21 Lesson-23