 |
| HTML and CSS tutorial for beginners in English |
Hello friends, welcome to KTL's HTML and CSS tutorial. Today we will study lesson 12.
In our previous lesson, we studied how to create lists in a web page.
Today we will study giving description of items in a list. We will also see how to create nested lists.
Description lists
In a description list we can give description for items in a list.
Let us see a description list. Open a new Notepad file. In this file copy Lesson-11 from <!doctype> tag to </p> tag.
<dl> tag is used for a description list. <dt> is used to define an item in a list. <dd> tag is used for description of this item. After </p> write the following code to create a description list.
<dl>
<dt>Cat</dt><dd>Cat is a pet animal</dd>
<dt>Dog</dt><dd>Dog is a pet animal</dd>
<dt>Tiger</dt><dd>Tiger is a wild animal</dd>
<dt>Lion</dt><dd>Lion is a wild animal</dd>
</dl>
Close body and html tags - </body>, </html>.
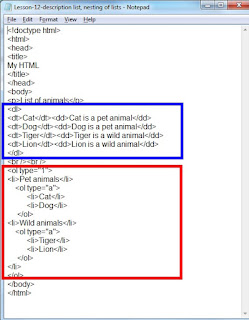
Save this as "Lesson-12". Again save as Lesson-12.html. See following figure 12-1 for clarity. See the output. A description list is displayed.
Nested lists
Now let us study about nested lists. A nested list looks as follows: Give <br /><br /> and write following code:
<ol type="1"> - Create list of type 1. (This is outer list).
<li>Pet animals</li> - First item in outer list
<ol type="a"> - Begin inner list for first item of outer list.
<li>Cat</li> - First item of inner list.
<li>Dog</li> - Second item of inner list
</ol> -End inner list
</li> - End first item of outer list
<li>Wild animals</li> -Second item in the outer list
<ol type="a">
<li>Tiger</li>
<li>Lion</li>
</ol>
</li>
</ol> - End outer list
Read above code carefully. A list inside another list is a nested list. This is very simple. Simply create one list inside another list.
 |
| Figure 12-1. HTML description list and nested list |
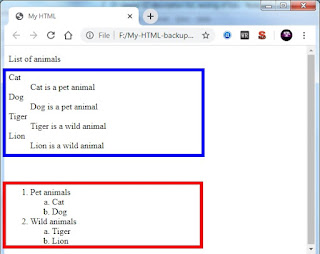
Let us understand this coding. There are two items in outer list "Pet animals" and "Wild animals". "Pet animals" contains a list of two animal names and "Wild animals" contains names of two animals.
Save file as "Lesson-12". Save same file as "Lesson-12.html". Click on figure 12-1 for PDF file of source code. See the output. A nested list is displayed.
 |
| Figure 12-2 HTML description list and HTML nested list |
Start attribute of <ol> tag
We can also change numbering of list items. For example instead of starting numbering from 1, we can start from 10. "start" attribute is used for this. For example, <ol start="10">.Important points:
1. In a description list we can give descriptions for items in a list.2. Tags <dl>, <dt>, <dd> are used for a description list.
3. We can create lists for items of a main list. This creates a list inside another list. This displays a nested list.
4. We can begin numbering from any number that we wish using "start" attribute in <ol> tag.
Lesson-11 Lesson-13