 |
| HTML and CSS tutorial for beginners in English |
Hello friends, welcome again to KTL's HTML and CSS tutorial. Today we will learn lesson 26.
In our last lesson we have studied CSS font properties.
Today we will study styling hyperlinks using CSS properties.
CSS styling links
We have seen CSS text properties in lesson-24 and CSS font properties in lesson-25. We can apply these properties to the text that is displayed on the hyperlink. We can use properties like color, font family, text decoration and so on for doing this.
Today, we will see how to apply CSS properties to the hyperlinks. Any hyperlink has 4 states. Let us understand them.
1. When a link is displayed in a web page, it is in its original state. User has not done anything like moving mouse on this link or clicking this link. This state is "link".
2. When we bring mouse on this its state is "hover".
3. If we click on the link then it becomes an "active" link.
4. After clicking on the link, it goes in "visited" state. Note that after clicking on a link, it remains in active state for only few seconds and soon it goes in the "visited" state.
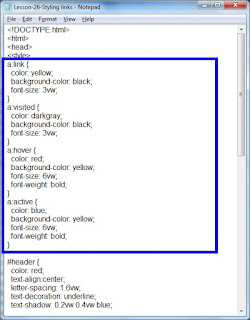
We can apply CSS styles for each of these states. Let us understand this. Consider the following code.
a:link {
color: yellow;
background-color: black;
font-size: 3vw;
}
a:visited {
color: darkgray;
background-color: black;
font-size: 3vw;
}
a:hover {
color: red;
background-color: yellow;
font-size: 6vw;
font-weight: bold;
}
a:active {
color: blue;
background-color: yellow;
font-size: 6vw;
font-weight: bold;
}
This code is very easy to understand. When this link is displayed in the web page its color is yellow and background is black. If we hover mouse on the link it becomes red and background color becomes yellow. Also when we bring mouse on the link it becomes larger. Immediately after clicking the link it will be displayed in blue as the state is "active" and background will be yellow. Once it goes in "visited" state its background will become black and its color will become dark gray. All this is self explaining.
Note that: We have to write styles in the same sequence as shown above. We cannot change the order.
Let us write this code in our script. Open a new Notepad file and copy every thing from lesson-25. Copy the code written above in the <style>.
In body create a link by writing following statement after last paragraph
<a href="lesson-25.html">Output of Lesson 25</a>
Save this file as "Lesson-26" and "Lesson-26.html". See figure shown below. Click on this figure for PDF file of source code.
 |
| Figure 26-1. CSS styling link |
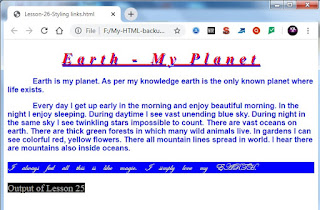
Double click on the HTML document. See the output.
 |
| Figure 26-2. CSS styling link |
Our hyperlink is displayed in the web page. Click on figure 26-2 or 26-3 to see actual output in a web page. Try all possibilities on the link and try to understand how it works. Observe the appearance when link is displayed first time in the page. Bring mouse on it and see how it changes. See figure below.
 |
| Figure 26-3. CSS styling link - hover |
Then click on the link and very quickly observe when it is in "active" state. Finally come back to our web page and see the appearance of link in "visited" state.
Note that:
1. Default hyperlink is underlined. We need to give CSS property
text-decoration: none;
to remove this line.
2. We can use buttons for displaying links. We see many web pages on internet where by clicking on buttons we navigate into other pages. In our lesson for "CSS box model" you will understand the concept of box model and using a box model you will be able to create a button in web page.
Important Points:
2. We can apply CSS text properties and CSS font properties to each of these states.
Lesson-25 Lesson-27