 |
| HTML and CSS tutorial for beginners in English |
Hello friends, welcome back to KTL's HTML and CSS tutorial. Today, we are going to learn lesson 2.
In lesson 1, we have seen what is HTML and how HTML works.Also,we have written our first HTML script and displayed our first web page
Today, we will learn the structure of an HTML file. HTML is a structured language. We have to follow specific structure when writing HTML.
Structure of HTML
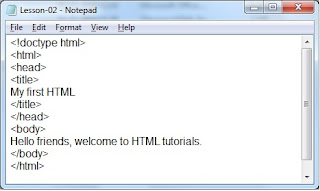
Let us begin to write. Open a new Notepad file and begin to type with me.First line in this file is <!doctype>. This is a declaration. This tells the web browser version of HTML. But modern web browsers have such technology that browsers do not need this statement. Still in HTML5 this declaration is retained, therefore we will use it in our script. HTML5 is the latest version of HTML. So, our first line is
<!doctype html> line 1.
Write second line <html>. This is a tag. This tag tells web browser that everything that appears after this line will be HTML. Carefully note how a tag is written. We write < (less than sign), then tag name, and then close it with > (greater than sign). Therefore, this tag is written as <html>. Next line is <html> line 2.
Now,a very important point that you should understand. Any HTML program has two parts, 1. Head and 2. Body. Head contains a title for web page. Head can also contain information which is later referred in body portion. Body portion has actual content. The browser interprets script in the body portion and displays a web page.
Let us take an example. Suppose we want text in red color, it should be bold, and we want to center it. We can define all this in the tag used for text in body section. But if we want this style at 10 places in a web page, then we will have to repeat this at 10 places. Instead, we can define all this only once in head section and use it in body as required. This makes our HTML script simple.
So first part in the HTML script is head. Give a tag <head> line 3.
Under that type title tag: <title> line 4.
Write the title "My HTML" line 5.
Close title tag </title> line 6.
Close title tag </title> line 6.
Every tag must have corresponding closing tag. Note that a "/" (forward slash) is used to close a tag.
Thus, we used the tag <title>, gave actual title, and then gave a closing tag. This forms an element. This is a title element. An HTML script consists of many elements. Every element begins with an opening tag and ends with a closing tag.
We have written a <head> tag, so, close it </head> line 7.
Now, we have completed two elements, title element and head element. Title element is inside the "Head" element.
Now let us start body section. Give tag - <body> line 8. Write under body: Hello friends, Welcome to HTML tutorials. - line 9. Close the body tag. </body> line 10.
Now close html. </html> line 11.
Our file is as follows:
 |
| Figure 2-1 Structure of HTML in English, HTML tags, HTMLelements |
Click on the title of figure 2-1 for PDF file of source code. Click "Save As", give file name "Lesson-02" and save file. This is a text file which we can open later any time in Notepad and edit it. Click "Save As", give file name "Lesson-02.html" and save it.
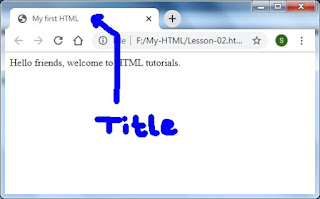
Go in windows explorer and double click on Lesson-02 HTML file. It is displayed in web browser as follows:
 |
| Figure 2-2 Output of Lesson 2, Structure of HTML |
In web browser title is displayed in the top left corner. Title is always displayed here. Output of body section is displayed in web page itself.
What is the difference between output of our Lesson-01 and Lesson-02? Really not much. Only the change is the title displayed. But remember, we have learned very important topic today - structure of HTML.
Structure of HTML - Nesting
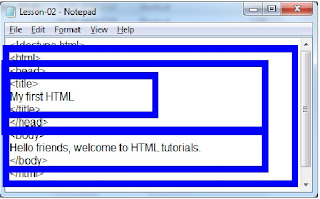
Again let us go in Notepad window. Let us look at our code. |
| Lesson 2-3. Nesting in HTML script |
Observe carefully the structure of HTML script. Outermost tags are <html> - </html>. Inside this, there are head and body sections. Inside head there is title element. This nesting structure needs to be carefully followed in HTML. This means, we should close every tag that we open at an appropriate place only. Otherwise, not doing so carefully gives rise to an error.
Important Points:
1. HTML is a structured language. Understand very clearly structure of HTML. It consists of elements. Nesting should be carefully done in HTML scripts.2. Any element begins with an opening tag and ends with a closing tag.
3. <!doctype> is a declaration, which browser interprets and understands the version of HTML.
4. <html> tells a browser that whatever is going to follow is html.
5. There are two parts of HTML. 1. Head and 2. Body. Head contains the definitions which are referred in body section. Body contains actual code, on executing which a web page is displayed.
Lesson 1 Lesson-3